Follow the Keep Account Secure prompts to up your Authentication Phone and email:
Authentication Phone = Enter the number you wish to use for authentication purposes. Once you enter a number, choose one of the options "Text Me" or "Call Me"
NOTE - Do NOT choose the "Text Me" option if you've entered a phone number that cannot receive texts (landline).
Authentication Email = Enter a non-CRL email address that you have real-time access to. You'll be emailed a link to click to complete this process. Use a PERSONAL email address that you have access to. DO NOT USE A CRL EMAIL ADDRESS. (In the event that you are locked out, you won't be able to get to the CRL email to verify your request.)
Click NEXT ...
- Click next to acknowledge and sign into your account again:
- Complete the 2FA process by selecting "Send me a Push" and accepting on your mobile device or if you are using a token select "Enter a Passcode":
- You can click "Yes" on the next prompt asking if you'd like to stay signed in:
- You'll be prompted to sign in one last time. Once you sign in you'll see the 0365 home page:
The office applications are on the left side of the page. You can open Outlook, Word, Excel, PowerPoint, etc. from here.
For a quick start guide on using CRL H, please download the document found here:
Click the "Sign In" link and login using your email address ( LastFM@crltechnologies.com)
In the upper right corner of your O365 instance, click on your initials (or avatar) to open this menu then click "My Account":
In the next menu, select "Password":
You can change your password here.
Passwords must follow the following complexity requirements:
Minimum of 7 characters
Must contain 3 out of 4:
An Uppercase Letter
A Lowercase Letter
At least one Number (0-9)
A Special Character (e.g. $,!,#,%)
** If you forget your password and need a reset, please contact the IT helpdesk.**
When changing your password:
1) Your password cannot be one of the last 24 passwords
2) You can only change your password once per day
3) Your CRL password SHALL NOT be used in personal non-work instances.
1.3. How To: Sync your CRL Account on a CRL PC - Compliant Device Resolution
If you're experiencing slow or unusual behavior while using a work application or you get a notification that your PC is out of compliance, try syncing your device to see if an update or requirement is missing. Sync CRL-issued PCs running Windows 10 or later from the system Settings app.
Follow these steps:
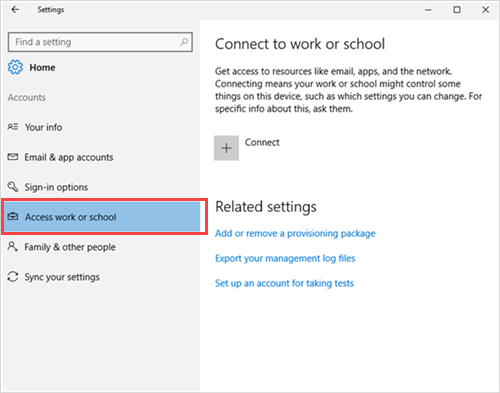
- On your device, select Start > Settings.
- Select Accounts.
- Select Access work or school:
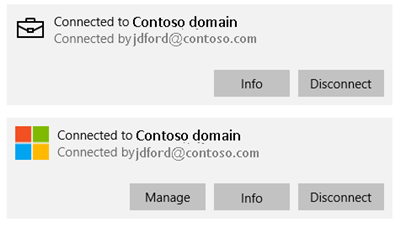
- Select your work account, marked with a briefcase icon or Microsoft logo.
- Select Info:
- Select Sync:
Note: In some cases, the sync may take up to 15 minutes. Please be patient and allow the sync to complete.
Once the sync is complete, please reboot your PC.
1.4. How To: Sync your CRL Account on a BYOD Device - Compliant Device Resolution
If you're experiencing slow or unusual behavior while using a work application or you get a notification that your device is out of compliance, try syncing your device to see if an update or requirement is missing. Sync BYO devices running iOS or Android using the Company Portal app.
Follow these steps:
iOS Devices:
To verify that the profile was installed, go to your VPN and device management settings. You should see the profile listed under Mobile Device Management.
Return to the Company Portal app.
The app will begin to sync and set up your device.
If prompted, tap Continue to update additional device settings.
Android Devices:
Sign in to the Company Portal app for Android.
Go to Settings.
Scroll down to Management Policy and tap Sync.
Wait while the Company Portal syncs your device. The screen will display the timestamp of the last successful sync.
2. CRL Account Quick Start Guide & Training
2.1. CRL Account Quick Start Quide
Please see the attached CRL-H Startup Guide
2.2. Sharing Files & Folders in Microsoft 365
File & Folder Sharing:
Check this link for information on how to share files and folders in Microsoft 365.
1) CRL Accounts are "work/school" accounts and not Personal accounts, this is important when signing on. 2) CRL is in the Government Community Cloud High (GCCH) and is more secure/restrictive than commercial/personal 365 accounts this means some features or processes may not be available to you.
3. CRL Email Accounts - Microsoft Outlook 365
3.1. Email Access Overview
Your CRL email (Outlook 365) may be accessed in several ways:
• The Microsoft Outlook 365 App installed on your CRL-issued asset
- If you are issued a CRL PC, this is configured once you open Outlook on your CRL PC and are connected to the CRL domain.
• The Microsoft Outlook 365 Web App via any web browser
- This may be accessed from any device with a web browser. You'll use your CRL-H log-in credentials to access the Outlook Web App.
Contact the CRL IT Team if you have any installation issues.
4. DUO 2FA
4.1. Endpoint Instructions (PC/Laptop)
Attached are the instructions on how to set up your PC/Laptop for DUO 2FA.
4.2. How to Transfer Duo Mobile to a New Phone
Duo Mobile Account Migration
Step 1: Install Duo Mobile on Your New Phone
Visit your app store (Google Play Store for Android or App Store for iOS).
Search for "Duo Mobile" and download the app on your new device.
Step 2: Open Duo Mobile on Your Old Phone
Open Duo Mobile on your old phone and navigate to the "Accounts" tab.
Select the account you want to transfer.
Step 3: Tap on "Device Options"
In the account details, tap on "Device Options."
Choose "Export Accounts" and follow the on-screen instructions.
Step 4: Scan QR Code on New Phone
Open Duo Mobile on your new phone.
Tap on "Add Account" and scan the QR code displayed on your old phone.
Step 5: Verify and Complete Migration
Verify the account transfer on your new phone by approving the notification on your old phone.
Your Duo Mobile accounts are now successfully transferred to your new device.
5. CRL Account OneDrive
5.1. OneDrive
Your personal files and storage will be in Microsoft OneDrive.
OneDrive for CRL Technologies users is a secure online storage space in the cloud provided for individually licensed users at CRL. OneDrive lets you share files, collaborate on documents, and sync files to your CRL computer.
Most of your files will automatically sync with OneDrive, including files located on your desktop.
Additionally, this will be the default storage spot for your Microsoft applications:
Outlook
Powerpoint
Excel
Project
Visio
To open OneDrive:
- You can get to OneDrive by clicking on the file explorer icon on your desktop:
or by typing "OneDrive" in the search bar:
- Once open, you can navigate to OneDrive in the left pane:
- Once open, you can navigate to OneDrive in the left pane:
Using OneDrive:
Use OneDrive like you would any other folder:
Notes:
.zip Files
- The OneDrive web interface does not support unzipping .zip files. However, you can use the OneDrive Desktop application to sync with your computer and be able to open .zip files.
- If you have already synced your OneDrive Desktop application with your computer, you can extract the files by right-clicking on the zipped file in the OneDrive folder on your computer, selecting “Extract All”, and then it will be unzipped.
5.2. CRL OneDrive Sync Instructions
☐ Open the local OneDrive application using the icon in the taskbar:
☐ Make sure that the OneDrive is connected to the CRL Technologies Inc tenant and click the “Settings” gear icon:
☐ Ensure that the following settings are activated:
Start OneDrive when I sign in to Windows – ON
Pause syncing when this device is in battery saver mode – OFF
Pause syncing when this device is on a metered network - OFF
☐Click “Advanced settings”
☐ Ensure that the following settings are activated:
File collaboration – ON
Click the drop-down arrow and configure “Ask before keeping both copies of a file that has a conflict” - ON
Files On-Demand – OFF
Limit download rate – OFF
Limit upload rate - OFF
☐ Click the “Manage backup” button at the top of the Sync and backup window:
☐ Select the following folders to backup:
Desktop
Documents
Pictures
☐ Click “Start Backup” :
The selected folders are now being backed up. Please let the CRL IT Team know if you encounter any issues.
6. CRL Phones
6.1. ZAC Communicator User Manual (Version: July 2020) & Video Walk-Through
If you don’t have ZAC installed on your PC, please request the application installed by contacting the IT Team through HelpSpot:https://crl.helpspot.com/
To make a conference call, open the ZAC app on your CRL PC:
Use your CRL login credentials to log into ZAC:
NOTE: Username MUST be all lowercase.
Note: Ensure “Use Windows Credentials” is unchecked (Slider to the left)
**Note** If you are the HOST and may need to leave the conference before it is over, please uncheck the "End call on host leave" option shown above. This is option is most used by Schedulers that Start meetings and then leave to perform other duties, or start additional meetings.
To create a conference:
Click the Conference icon.
Click Schedule.
Enter the conference name, frequency (type), date, time, duration*.
Leave Web Collaboration at NONE
*Duration is for scheduling purposes only, the call will NOT end after the number of minutes selected.
Set the "End call on host leave" option as appropriate
Click Save and Invite. An e-mail template (aka. Meeting Maker) with the conference information will be presented. Enter the desired recipients and send the e-mail.
OR click Save to create the conference without sending invites.
Example of Outlook calendar invite:
To start the conference:
Click the desired conference.
Click the start icon
The audio will be connected.
NOTE: Music will play if only one participant is in the meeting.
You can mute or disconnect participants as the conference owner once the conference is started.
Click the icon to display the Participants menu.
Click Participants:
Once a conference is created, you are able to start, edit, invite users, or delete the conference.
NAVAIR Support:
In order to set up a reoccurring conference, ELIGIBLE users need to contact the NAVAIR National Help Desk. The help desk schedules the conference, after the conference is set up they receive the meeting maker including a dial-in number and conference ID number.
** This replaces the Zulty's Mobile Communicator ** If you have the 'green one' installed, uninstall it, and download/install the MX Mobile.
Your settings will transfer to the new app, no need to re-configure it.
Please see the attached guide for iPhone configuration - MX Mobile
***NOTE: Please enter your username in all lowercase letters***
The FQDN for CRL Zultys set up is:
mxe.crltechnologies.com
6.4. Android Configuration
Please see the attached guide for Android configuration.
***NOTE: Please enter your username in all lowercase letters***
The FQDN for CRL Zultys set up is:
mxe.crltechnologies.com
7. CRL Software Management
7.1. Software Policy, Baseline, and How to Request New Software
CRL Software Policy
The CRL IT Team tracks, reviews, approves/disapproves, and logs changes to all organizational systems.
Only CRL Systems Administrators (SAs) and CRL privileged users (PUs) can install/remove software on CRL Information Systems (IS). Non-baseline SW is approved by the IT Team before installation.
All requested Changes will be presented for review, security impact analysis, discussion (if required), and approval.
All Emergency Changes will be presented, as outlined in the appropriate process, for review, security impact analysis, discussion, and approval unless time constraints require changes to be made before submission or, if time constraints are the case, submission to the appropriate reviewer(s) must be done after the fact.
Software Baseline
The software listed here has been approved for use on CRL Information systems:
In the "How would you categorize this request", choose option number 6.
Fill out all pertinent information in the provided fields.
NOTE: The more detail you provide the better the IT Team can assess the requirement. Please be as detailed as you can.
Standby for updates. The testing and approval time can vary depending on several factors:
Software compatibility with CRL systems
Software expense and funding decisions
Software security and vulnerability research
Software version control and patching considerations
8. Printer & Bluetooth Device Setup
8.1. Printer Setup
Home & Office Printer Setup:
Printers at the CRL office should be mapped by default. If you'd like to add a printer or are setting up a home printer, follow the steps below (For wireless setup, scroll to the bottom of this page):
Step 1: At home: Connect the printer to your computer using the USB cable and turn it on. If at the CRL office, skip to Step 2.
Step 2: Open the Settings app from the Start menu:
(Type "Printers" in the search bar):
Step 3: Click "Printers and Scanners":
Step 4: Click "Add device":
Step 5: If Windows detects your printer, click on the name of the printer and follow the on-screen instructions to finish the installation. And you're done.
If Windows doesn't find your connected printer, click on the "The printer that I want isn't listed" link.
Let the Windows troubleshooting guide help you find your printer. It will search for available printers and help you download the drivers for them.
If that doesn't work, you can use the printer's IP address (if you know it):
Enter the printer you want to add information here:
The wizard will show .. “Connecting to Printer” ….
Select the driver that matches your printer or choose "Generic".
**If you are having trouble, make a note of your device's make and model and the IT Team may be able to download the drivers and installation tools for your printer, then assist with installation. This will require approval from the IT Manager and may require some additional steps**
Wireless Printer Setup:
The steps to install a wireless printer may vary by manufacturer. In general, however, modern printers today will detect your network and automate the installation.
Step 1: Use the printer's LCD panel to enter the wireless setup.
Step 2: Select your Wi-Fi network. You'll need to know your home network's SSID, which you can find by hovering your mouse over the Wi-Fi icon in the taskbar.
Step 3: Enter your network password.
In some cases, you might need to temporarily connect your printer to your computer via USB to install the software. But otherwise, that's it. You should find your printer automatically added in the Printers & scanners section under Settings > Devices.
8.2. Bluetooth Device Setup
To pair a Bluetooth device to your PC, type the word "Bluetooth" in the search bar on the lower-left section of your desktop and press enter:
Click the "Add Bluetooth or other device" and follow the manufacturer's instructions for pairing your device.
9. Web Browser Tips and Troubleshooting
9.1. Saving your Edge Bookmarks (Favorites)
***CRL-H Migration Prep***
Be sure to save this file to your desktop and name it something you can recognize.
Export Edge favorites to HTML file
To export Microsoft Edge favorites to a file, use these steps:
Open Microsoft Edge.
Click the Favorites (star) button.
Click the More options (three-dotted) button and select the Manage favorites option.
Click the More options (three-dotted) button from the top-right and select the Export favorites option.
Source: Windows Central (Image credit: Source: Windows Central)
Select a folder location.
Specify a descriptive name for the exported file.
Click the Save button.
Once you complete the steps, all your favorites will export to an HTML file that you can save as a backup and import it to the same or different browser.
You can also access the settings to import bookmarks by clicking the Favorites (star) button (Ctrl + Shift + O keyboard shortcut) in the address bar or opening the Settings and more menu, selecting the Favorites option, clicking the Favorites (three-dotted) option, and selecting the Export favorites option.
9.2. Saving your Chrome Bookmarks (Favorites)
***CRL-H Migration Prep***
Be sure to save this file to your desktop and name it something you can recognize.
Take all your Chrome bookmarks with you by exporting them to an HTML file:
On your computer, open Chrome.
At the top right, click More.
Select BookmarksBookmark Manager.
At the top, click MoreExport Bookmarks.
Chrome exports your bookmarks as an HTML file.
9.3. Clear Cache & Cookies - Microsoft Edge
How to clear the cache and cookies in Microsoft Edge
To clear cache and cookies when using Microsoft Edge, follow the steps detailed below:
Click on the. menu button situated in the upper right corner.
Click on Settings.
Under Clear browsing data, click on Choose what to clear.
Click on Clear.
Delete cookies in Microsoft Edge
Microsoft EdgeWindows 10Windows 8Windows 7Edge for Mac
Delete all cookies
Open Microsoft Edge and select Settings and more > Settings > Privacy, search, and services.
Under Clear browsing data, select Choose what to clear.
Under Time range, choose a time range.
Select Cookies and other site data, and then select Clear now.
Delete cookies from a specific site
Open Microsoft Edge and select Settings and more > Settings > Cookies and site permissions > Cookies and site data.
Select See all cookies and site data.
Search for the site's cookies you want to remove.
Delete cookies every time you close the browser
Open Microsoft Edge and then select Settings and more > Settings > Privacy and services.
Under Clear browsing data, select Choose what to clear every time you close the browser.
Turn on the Cookies and other site data toggle.
9.4. Updating DoD Certificates Using InstallRoot
How-to Guide: Updating DoD Certificates Using InstallRoot
This guide will walk you through the process of updating Department of Defense (DoD) certificates using the InstallRoot application. InstallRoot is a tool the Defense Information Systems Agency (DISA) developed to manage DoD PKI certificates on Windows systems.
Run the downloaded file to start the installation process.
Follow the on-screen prompts to install InstallRoot on your system. You may need administrative privileges to complete this installation.
2. Launch InstallRoot
Once installed, launch the InstallRoot application by searching for it in your Start Menu or by double-clicking the desktop shortcut.
You might be prompted for admin credentials or asked to allow the app to make changes to your device. Click Yes or enter the admin password to proceed.
3. Select Certificate Stores
When InstallRoot opens, you will see several tabs representing different certificate stores, such as:
Microsoft Store: For DoD certificates used by Windows applications.
Firefox Store: For DoD certificates used by Firefox browsers.
Java Store: For applications relying on Java.
Select the stores where you need to update or install certificates. For most users, the Microsoft Store will be sufficient, but include others like Firefox or Java if your environment requires them.
4. Update DoD Certificates
Click the "Install Certificates" button. This will download the latest DoD certificates from DISA and automatically install them into the selected certificate stores.
If you're updating, InstallRoot will overwrite outdated certificates and add any new certificates from the DoD.
5. Verify Installation
After the installation is complete, you can verify that the certificates were updated successfully:
Navigate to the Microsoft Store tab and scroll through the list of installed certificates.
Ensure that the DoD root and intermediate certificates (e.g., DoD Root CA 3, DoD Root CA 4) are listed and valid.
If you installed certificates in the Firefox or Java store, repeat the verification process within those tabs.
6. Close InstallRoot
Once you’ve verified the certificates have been updated, you can close the InstallRoot application.
7. Testing the Certificates (Optional)
To confirm that the certificates are functioning properly, try accessing a DoD website (e.g., https://www.dmdc.osd.mil).
Ensure that your browser recognizes the DoD certificates and that there are no certificate-related errors when loading the page.
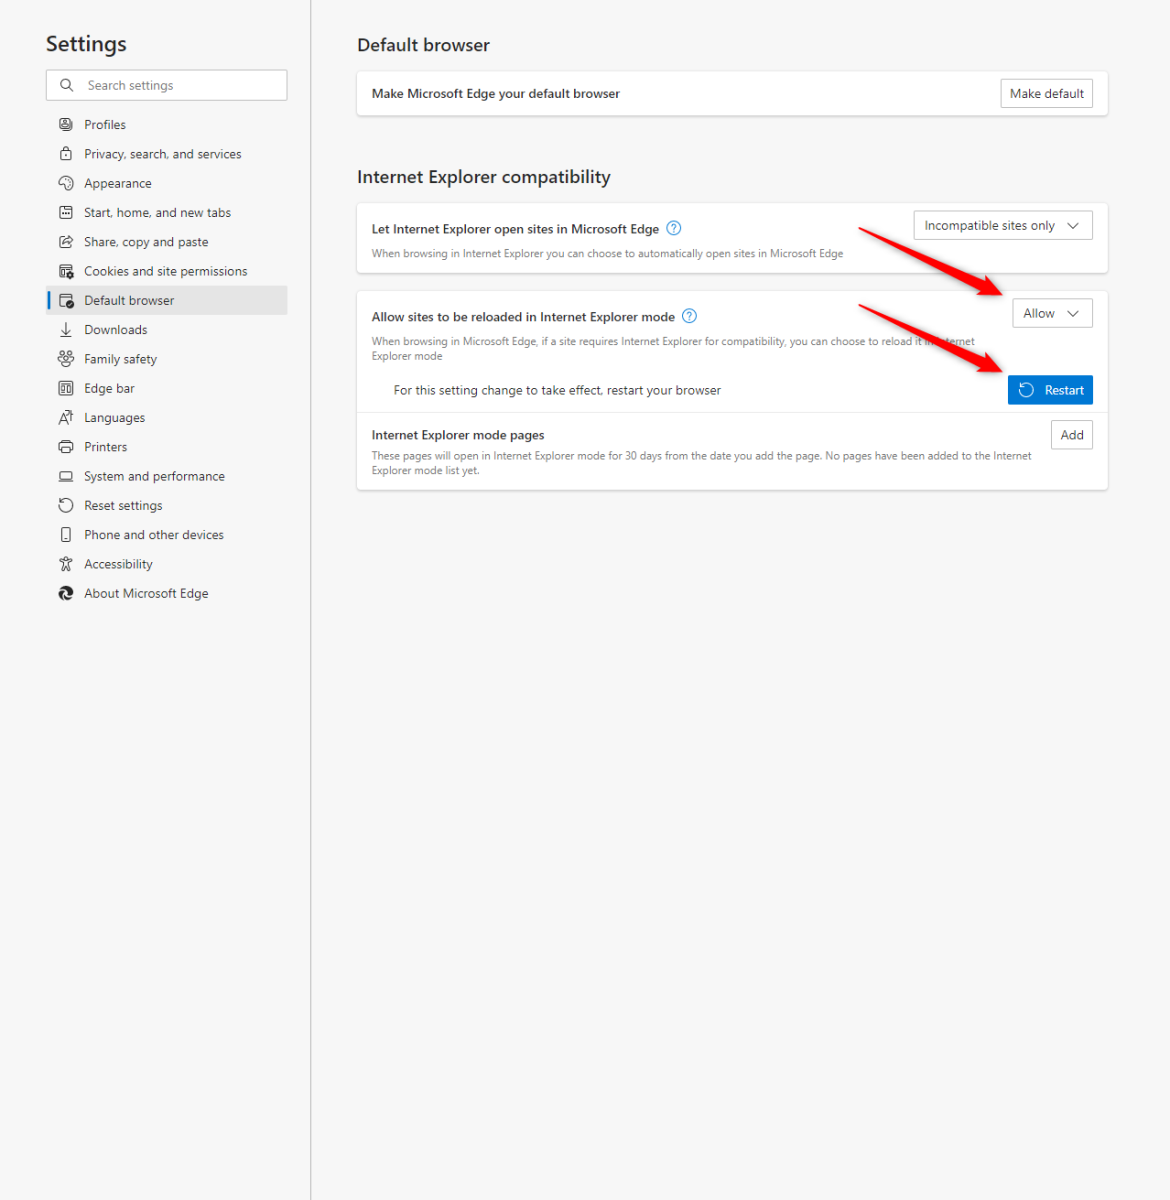
9.5. How to enable Internet Explorer Mode in Microsoft Edge - Microsoft Edge
To enable Internet Explorer mode in Edge, take the following steps:
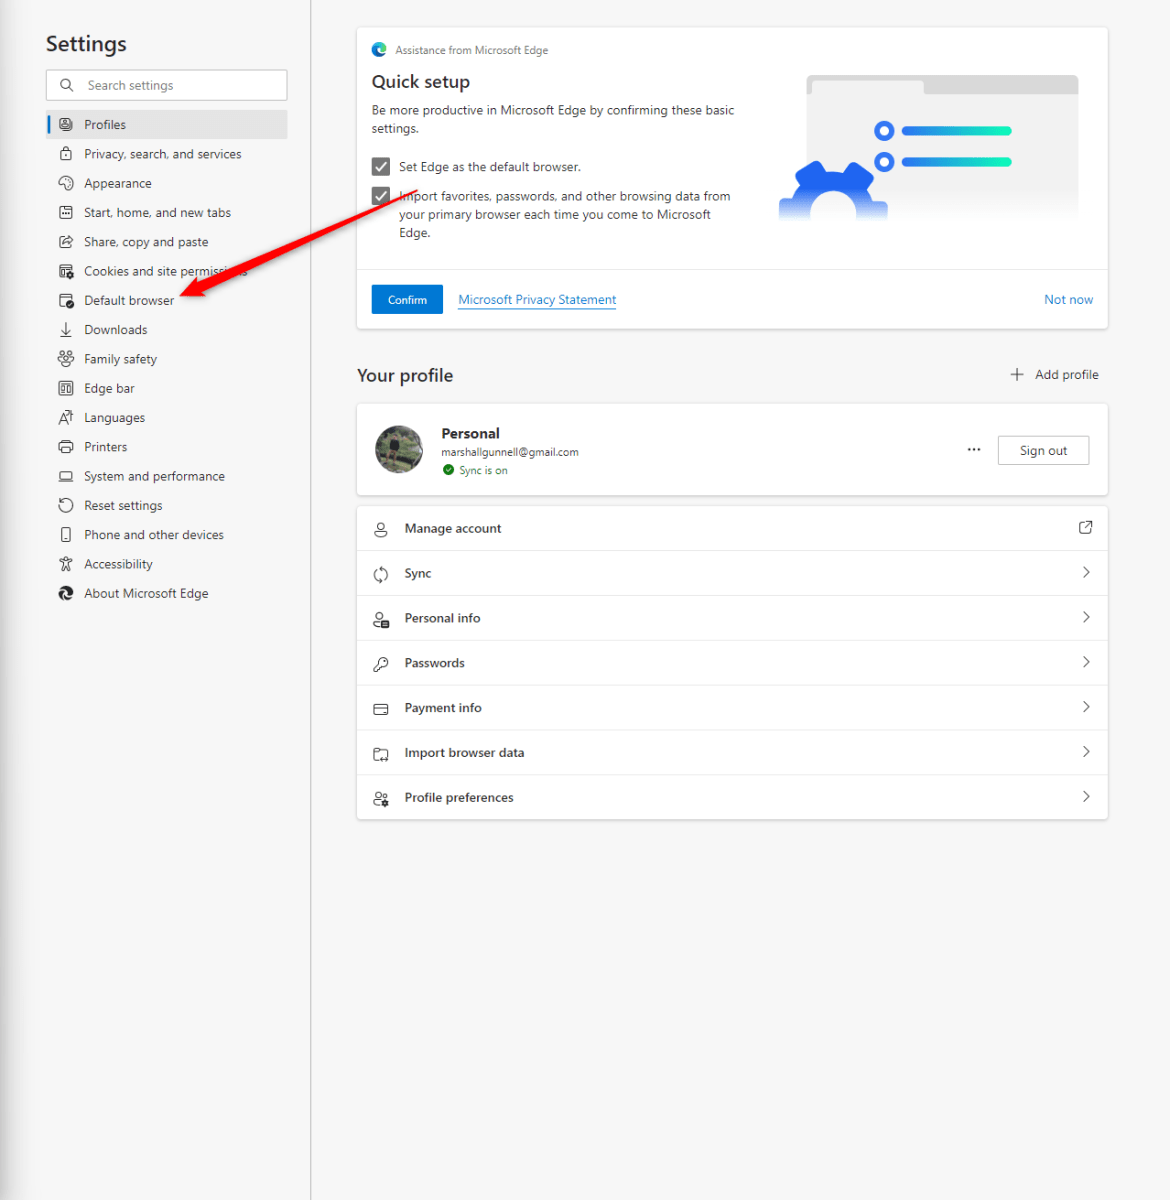
- To use Internet Explorer Mode in Edge, launch Edge and click the “Ellipses” button in the top-right corner of the window. In the drop-down menu that appears, select “Settings.”
- Next, click “Default Browser” in the left-hand pane.
You’ll now be on the Default Browser Settings screen. In the “Internet Explorer Compatibility” group, set the “Allow sites to be reloaded in Internet Explorer mode” option to “Allow.” You’ll then need to restart your browser by clicking the blue “Restart” button for the changes to take effect.
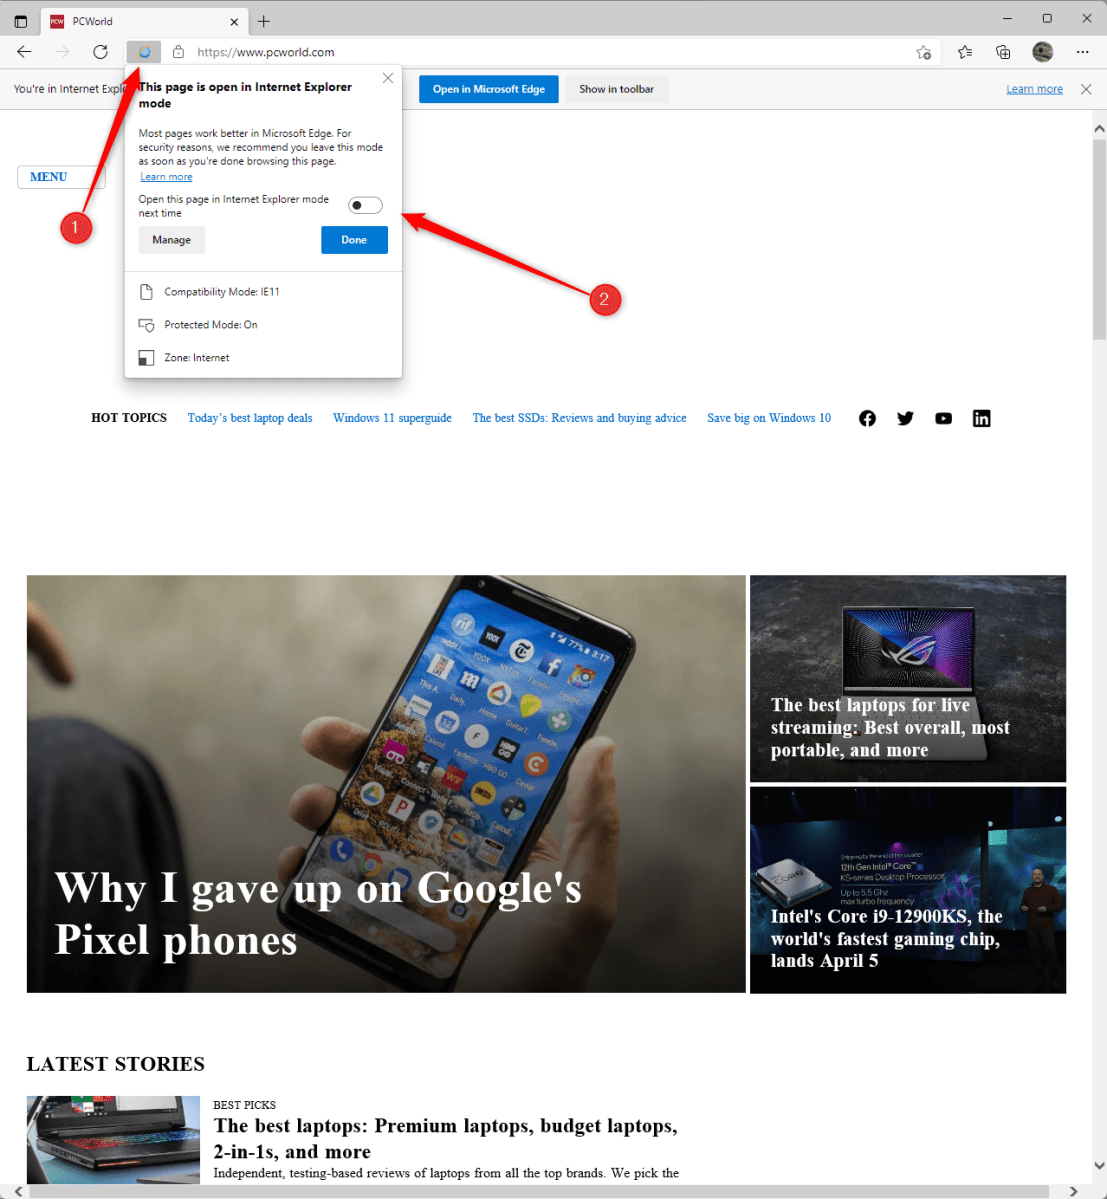
Once the browser reloads, navigate to the site you want to view in Internet Explorer Mode. Once on the site, click the “Ellipses” button in the top-right corner of the window, and then select “Reload in Internet Explorer Mode.”
The page will now reload in Internet Explorer Mode. You’ll know you’re using this feature if the Internet Explorer logo appears to the left of the URL in the address bar.
You can also tell Edge to always open this page in Internet Explorer Mode by clicking the browser icon and toggling the slider next to “Open this page in Internet Explorer mode next time” to the On position. If the slider is toggled to the right, it’s enabled. If the slider is toggled to the left, it’s disabled.
If you want to open the site in Microsoft Edge again, just click “Open in Microsoft Edge.”
Requesting installation of Acrobat DC to support the following tasks:
< tasks that require the software >
If you have a preferred time and date, please let us know and we will accommodate it as best we can.
10.2. Acrobat DC First Log in
User Setup:
Adobe Acrobat DC
This is a Quick Start to get you started using Acrobat DC.
Open Adobe Acrobat DC by double-clicking the icon on your desktop
Create an account using your CRL Technologies email address and Continue
Your account/email can be verified in two ways:
An email will be sent to you with a verification link, you can use that link to verify your ACCOUNT, but you will still need to log in with your new Adobe ID to use the software.
You will also receive the below and a Code will also be sent to your email.
Verify your Identity with the code that was emailed to you
If successful, Acrobat DC will start and you can begin using the software.
IF YOU RECEIVE THE BELOW:
You have successfully created an ACCOUNT but have not been assigned a License.
If you believe have reached this in error, please contact the Helpdesk
The BEST way is to reply to the Software Request ticket you submitted to have Acrobat DC assigned to you
** VERY IMPORTANT **
The CRL-provided license for Acrobat DC is also a CLOUD solution.
This means you have access to the same tools in the cloud (online) as you do on your desktop
** DO NOT PROCESS OR STORE SENSITIVE MATERIALS USING THE ONLINE TOOLS/STORAGE **
This includes, but is not limited to CRL Proprietary information, FOUO, CUI, or other controlled documents.
** Use the Desktop Version **
10.3. Adobe Acrobat Please wait... error
You attempt to open a PDF file and get the following error:
Please wait... If this message is not eventually replaced by the proper contents of the document, your PDF viewer may not be able to display this type of document.
This error occurs when you try to open some PDF files in a web browser instead of using a dedicated PDF reader (Adobe Acrobat).
Try this to correct the error:
1. Right-click the PDF, choose Open With > Choose default program or another app in.
2. Choose Adobe Acrobat Reader DC or Adobe Acrobat 2017 in the list of programs, and then select Always use this app to open .pdf files.
You should now be able to read your PDF in Adobe Acrobat or Reader and avoid this problem in the future.
10.4. How to Encrypt and Password Protect Adobe PDF files
Using Adobe Acrobat, perform the following steps:
- Select "Tools" (located in the menu bar at the top of the page):
- Select "Protect" in the Tools menu:
Alternatively, you can select "Protect" from the menu on the right side of the page:
- Select "Protect using Password" (located underneath the tool bar above the document):
- Fill out the information in the prompt:
(To encrypt, expand the "Advanced Options" tab and choose the option "Encrypt with Password)
Note: Your files will be securely handled by Adobe servers and deleted unless you sign in to save them.
10.5. How to send an encrypted email containing an Acrobat PDF file
- Select "Tools" (located in the menu bar at the top of the page):
- Select "Protect" in the Tools menu:
Alternatively, you can select "Protect" from the menu on the right side of the page:
- Expand the "Advanced Options" drop-down then select "Create Security Envelope " (located underneath the toolbar above the document):
- Follow the prompts for "Files to Enclose" then hit Next:
- Choose and Envelope Template then click Next (if you are unsure which to choose, you can just click Next):
- Choose the delivery method (Send the envelope now):
Note: You may see the following pop-up:
Select "Yes" and proceed to the next step
- Select the policy from the list (you may have to click the "Show all policies" check box)
- Select is "Encrypt with Password" and click Next
- OPTIONAL: Create your own Security Policy by selecting "New Policy":
Creating a Security Policy:
If you choose to create a security policy, follow these steps:
- Select the type of security (Use passwords):
- In the General Settings tab, choose either "save these settings as a policy" and click Next:
- Choose the password and encryption options and click Next:
- Review the Summary and click Finish
- Select the policy from the list (you may have to click the "Show all policies" check box:
- Prepare to send the email by clicking "Finish":
- Select the Password Security settings and click OK:
- Select the "Send email" preference:
WARNING
***DO NOT include the password in the email attached to your security envelope. This defeats the purpose and will compromise the data you are sending.***
- Communicate the password for your envelope in a separate email to your recipients or use another means to communicate the password.